![]() 1, 2,
3, 4
,5, 6,
7, 8,
9, 10,
11 ,12
1, 2,
3, 4
,5, 6,
7, 8,
9, 10,
11 ,12
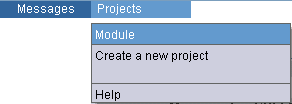
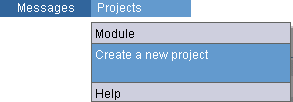
MESSAGES, THE USERS, LISTINGS, E-MAIL, MY ORGANISATION, PROJECTS, STATISTICS, TEAM, VOLUNTEERS, ACTIVITY REPORT BY EMAIL, VEF ONLINE
|
This
menu enables you to have precise information concerning the various
projects of your own organization, but also on those of your partners.
It also enables you to create new projects only for your organization.
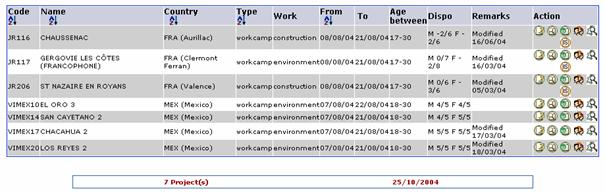
Indicate
according to data's that you have: dates of the project, country, the
type of work (construction, environment...) the type of project
(building site short term, SVE...), references of the project (separated
by `.') and finally the name. Click
on
The
list of the various projects corresponding to the criteria of your
research appears on the screen.
Are
indicated in the order: the code, the name, country, the type of the
project, work and dates. Then the places by sex available are indicated
on the project, a column is intended for the remarks concerning this
project Finally
the last column enables you to have more precise information on the
building site and to carry out modifications: click on one of the
actions interesting you ·
Depending
on whether the project comes from your organisation or not, the fields
that can be modified will differ. To
modify one of your partner’s projects, you will only be able to
modify the registration fees for your organisation and the description
part in your language. If
the project belongs to your organisation, you may modify all the
fields. (see Create a new project) The
second time you validate, an option allows you to automatically inform
your partners of the changes maded. If the changes are not important,
select the option « save without informing my partners »,
otherwise an e‑mail will be sent and an alert will be
posted on e-vet for all your partners. But
you have here the possibility of managing the allotements. Click
on this bond :
Indicate
for each organization the number of allotements available for each one
of them then click on
·
This
section enables you to read the information detailed concerning the
project. To refer to Create a new project
Here
you can also reach the list of volunteers. You
thus have access to the map
You
thus have information on the various participants in the files. The
second column indicates the camp leader in the project. Then
you see the code of the organization which sends the voluntary one. Then
you have an indication on the name and first name of voluntary, on its
sex, its date of birth and
its age, and finally its nationality. ·
This
section enables you to locate on a map the place of the project. The
program serves of information corresponding to the city for this
cartographic bond, at
default, information used
will be the station nearest. An
additional action is possible for the projects organized by your
own organization: ·
This
section enables you to modify the infosheet. Bond
hypertext. Teams
1.2.
DELETING
A PROJECT
You
can delete a project only if there are no registrations in the project.
The project will be marked as deleted, even if it stays in the data
base. Each
action to create, modify or delete a project will be registered in the
base, with the name of the user and the hour of the action.
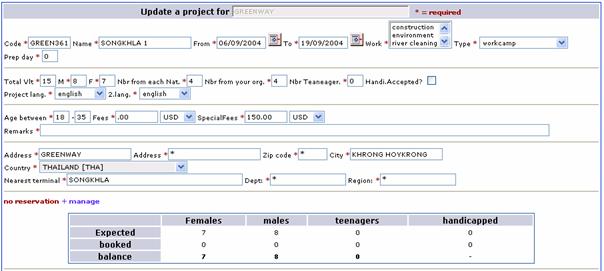
· To create administratively the project and to define it: You
must thus indicate:
·
The project
code proposed automatically is the same as that of your
organisation, but you are free to change it. The project code can
contain up to 30 alphanumeric characters. Please avoid using
spaces, dashes or underscores, as well as any other ponctuation sings. ·
The name
can contain up to 50 characters. · You can insert the dates or use the calendar by clicking on the icon. The program will verify if the dates are valid . ·
You
must choose at least one type of work. You can choose several
using Ctrl+click mouse or Caps+click. ·
Choose
a type of project from the rolling list. The type [wait] is
a type of project that can be used when you don’t know where to place
a participant during registration or pre-registration. ·
Jour Prep:
This information is important for your camp leaders : How many days
before the beginning of the workcamp must they arrive in order to
prepare for the arrival of volunteers. Below
indicate :
·
Total participants : Here you must insert the total number of participants, including the
workcamp leader. (The leader must be registered as a participant and
marked as workcamp leader to be recognized as such by e-vet) ·
The
number of participants by sexe: M : number of male participants
(normally 50% of the total number), F: number of female
participants in the project. ·
Number
of people by nationality
: Here you will insert the number of participants by nationality that
you will accept in the project. ·
Number
of people from your organisation : This information allows you to
reserve some spaces for your national participants in the project. ·
Number
of teenagers’ participants : Insert 0 if you do not wish to
accept teenagers (under 18) in
the project. You
may choose 2 languages for each project. Below indicate :
·
Age between
: Here you may insert the minimum and maximum age for the participants
in the project. The minimum age must be between 10 and 60 and the
maximum age between 14 and 99, the limits varying then from 10-14 to
60-99. ·
Registration
fees : Insert the fees that you will ask your volunteers to participate
in thes project in your currency. Your partners must insert their
registration fees that they will ask for the project that you will
create. ·
Extra fees
: Here you will insert the extra fees (often to be payed on arrival to
the project by the participants). Your partners will see this sum but it
will no be possible for them to change it. ·
Remarks :
Here you can insert important information that you would like to share
with your partners (if the work is difficult at the camp, for example),
think about writing it in English as it will not be possible to
translate it later on. The
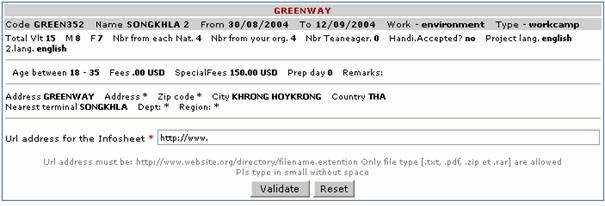
fourth part will allow you to register the address of the project :
·
the Address
of project. Insert (-) if you do not know them ·
The Zip
code is used in the search tools. ·
The City.
The map links will use the information inserted in this field. ·
The Country ·
The Nearest
terminal, you may include the information about the nearest access
for international arrivals. The
map links will use the information inserted in the fields « closest
terminal » if the field « city » is empty. ·
The Dept
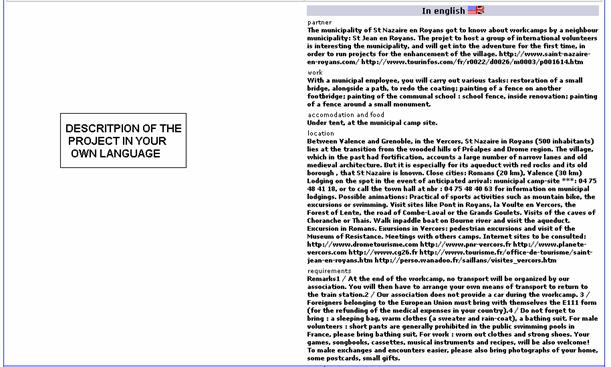
and region will be used to obtain national statistics. · Descritpion of the project :
The
left hand side module must be completed in your language : 1 :
information concerning your partner 2 :
work carried out on project 3 :
details concerning housing (at the inhabitant, under tent...) and food
(if are included in the expenses...) 4 :
the geographical situation of project 5 :
if the project requires a particular need (capacity, thing to be
brought on the project...) 6 :
the place and hour of appointment for the 1st day of project 7 :
finally, the last framework corresponds to the address of the
project. The
right hand side module must be completed in English, unless it is a
project only for you because your partners will only be able to look at
this part of the page. And with the description included in this part,
they will be able to translate it into their own language on the left
hand side of the page. Each
participant can create their own version of the description in their
language. A partner does not have access to the translations of the
other partners, even if they use the same language. In
the descriptions, you can use html codes to indicate active hyperlinks
like the e-mail address or the web sites to surf in. Use
the codes (<a href="mailto:xxxxx@xxxxx.xxx">texte
of the link </a>) for an e-mail address and <a href="http://www.xxxxxxx.xxx">texte
of your web site </a>. With this method, you will give your
partners the possibility to have access to your info sheets directly. Example
: Your project FRT321 has an info sheet in a pdf format on your web site
at the address http://www.monsite.org/infosheet/frt321.pdf
You
just need to include in the field project address the following:
<a href="http://www.monsite.org/infosheet/frt321.pdf">Download
infosheet</a>. A
simple click will allow your partners, and only them (as others wont see
this information) to have access to the latest version of your
infosheets. To
garantie better security, we will suggest that you do not use simple and
evident names in the project code but more uncertain and unique names
(in a future version of E-vet, the program will create a new name for
each project, like it does with the participants at this time.)
Afterwards you will just have to create the infosheets with these names
and to put them on your website, and insert this address in the field project
address. ·
List of
the documents required for this project :
Here
you will insert (in English so it can be understood by your partners)
the information about specific documents requested for registration in
the project. Registrations will be blocked if the user does not confirm
that he has received the documents requested. Please make a difference
between the documents required for registration on a project (police
records, motivation letter) and the general documents needed to register
(parental authorization, medical certificate) that are defined in the
menu (organisation, option « Define the complementary documents for my
organisation”) . Click
on
Check
that the data are exact, to modify it if it is necessary, if not click
on
|